

how to install under cabinet lighting
Table of Contents
Lighting can completely transform your kitchen, especially when it comes to those dim, shadowy spots under the cabinets. Whether you’re prepping meals, reading recipes, or just want your space to feel more inviting, learning how to install under cabinet lighting is one of the smartest DIY upgrades you can make. It’s simple, affordable, and the results are impressive.
In this guide, we’ll walk you through everything from selecting the right lights to installing them like a pro—no electrical license required.
Why Install Under Cabinet Lighting?
Before jumping into tools and wires, let’s talk about why under cabinet lighting matters.
Benefits of Under Cabinet Lighting:
- Eliminates shadows: Task lighting where you actually need it.
- Enhances kitchen ambiance: Adds warmth and depth to the space.
- Boosts home value: A small upgrade with a big impact on appearance.
- Energy efficiency: Especially when using LED under counter lights, which use less electricity and last longer.
- Improves safety: Better visibility for chopping and cooking.
Whether you’re upgrading your kitchen or just improving everyday functionality, fitting under cabinet lights is a no-brainer.
Types of Under Cabinet Lights to Consider
Choosing the right type of light is step one. Each comes with its own benefits and installation approach.
1. LED Under Counter Lights
These are by far the most popular and for good reason:
- Energy-efficient and long-lasting
- Low heat output
- Sleek and modern designs
- Often dimmable
LED strips, bars, or puck lights all fall into this category.
2. low voltage under cabinet lighting
If you’re concerned about energy usage or want an easier installation process, low voltage under cabinet lighting (typically 12V or 24V) is a great choice. It’s safer to work with and easier to hide, making it perfect for DIY setups.
3. Hardwired vs Plug-in vs Battery-powered
- Hardwired: More permanent and seamless but may require an electrician.
- Plug-in: Easy to install and ideal for renters.
- Battery-powered: No wiring needed—great for small sections or temporary solutions.

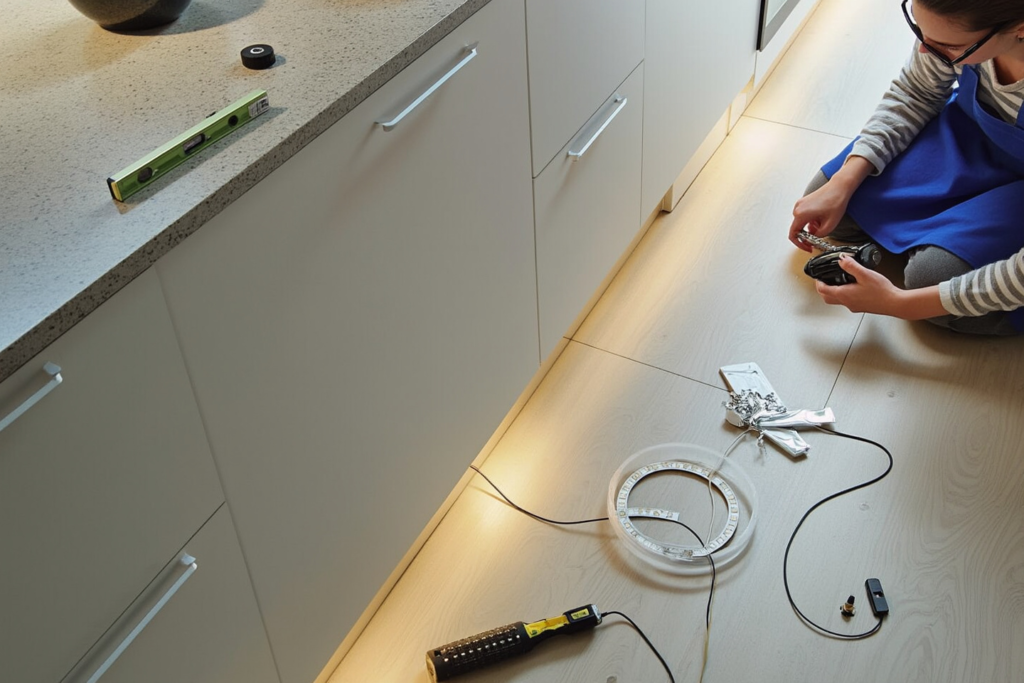
Tools and Materials You’ll Need
To make this DIY lighting upgrade successful, gather your materials in advance.
Basic Toolkit:
- Under cabinet lighting kit (LED strips, bars, or pucks)
- Screwdriver or drill
- Measuring tape
- Pencil or chalk
- Level
- Double-sided adhesive (if using tape lights)
- Wire clips or cable management tools
- Transformer (for low voltage setups)
- Wire nuts or connectors (if hardwiring)
Step-by-Step: how to install under cabinet lighting
Now let’s get to the good stuff. Follow these steps to install your lights like a pro—even if you’re new to DIY.
Step 1: Plan Your Layout
Measure the length of the cabinets and decide how many light strips or fixtures you’ll need. Mark out where each light will go with a pencil.
💡 Pro Tip: Place lights toward the front of the cabinet bottom for the best task lighting.
Step 2: Test the Lights
Before installing anything permanently, plug in or connect your lighting to make sure all units are working. This simple step will save you headaches later.
Step 3: Mount the Lights
Depending on your light type, follow one of these methods:
For LED Strip Lights:
- Clean the surface to remove dust or grease.
- Peel and stick the adhesive backing under the cabinet.
- Press firmly to secure.
For Puck or Bar Lights:
- Use screws or mounting brackets provided in the kit.
- Make sure the lights are level and spaced evenly.
🔌 If you’re fitting under cabinet lights with a plug-in design, make sure the cord can reach your outlet.
Step 4: Route and Conceal Wires
Use wire clips, channels, or adhesive cable holders to neatly route wires behind cabinets or along seams. Clean cable management not only looks better but prevents snagging or tangling.
If you’re installing low voltage under cabinet lighting, this is where you’ll also connect your transformer and possibly run wires to a wall switch.
Step 5: Make the Final Connections
For plug-in lights, simply connect the plug to a nearby outlet. For hardwired systems, this step may require wiring into an existing junction box or switch. If you’re unsure, consult a licensed electrician.
Make sure everything is properly connected and secure before flipping the switch.
Step 6: Test and Adjust
Once your lights are on, check for:
- Even light distribution
- Secure mounting
- Neat wiring
- Working dimmers (if applicable)
Make any adjustments needed for a clean, professional finish.
Common Mistakes to Avoid
When learning how to install under cabinet lighting, a few missteps can take away from the end result. Avoid these common issues:
- Installing lights too far back: Creates shadows and reduces functionality.
- Skipping wire management: Messy wires can ruin the look.
- Using the wrong power source: Make sure your transformer matches your light type.
- Not testing first: Always check your lights before installing.
How to Maintain Under Cabinet Lighting
Once installed, maintenance is simple:
- Clean regularly: Use a soft cloth to remove grease and dust.
- Check connections: Every few months, inspect wires and fittings.
- Replace LEDs when needed: Though rare, even LED lights will eventually need replacement.
If you chose LED under counter lights, you’ll enjoy years of consistent brightness with minimal upkeep.
When to Hire a Pro
While many homeowners can handle fitting under cabinet lights on their own, some situations call for expert help:
- Hardwiring into the home’s electrical system
- Adding new switches or dimmers
- Running wires through walls or tight spaces
For advanced wiring, hiring an electrician ensures everything is safe and up to code.
Design Tips to Enhance Your Kitchen Lighting
Beyond function, under cabinet lights can be a key element in your kitchen’s design. Here’s how to get the most out of your new lights:
- Use warm white LEDs for a cozy, inviting glow.
- Install a dimmer for mood lighting during dinner or evening hours.
- Mix lighting types: Combine puck lights with strips for layered light.
- Add lighting to more than one area: Consider cabinets, pantries, or even toe kicks.
Final Thoughts
Now that you know how to install under cabinet lighting, you’re just a few steps away from a more functional and beautiful kitchen. Whether you go with LED under counter lights, low voltage under cabinet lighting, or a simple plug-in setup, the transformation will be immediate.
This simple DIY project adds elegance, increases visibility, and improves daily use of your kitchen—all without a major renovation.
Call to Action
Ready to brighten up your kitchen?
Start planning your project today and explore the best fitting under cabinet lights for your space. Whether you’re going for sleek LED under counter lights or reliable low voltage under cabinet lighting, you’ll be amazed by the difference this small upgrade makes.
💡 Light up your kitchen—one cabinet at a time.